Thursday, October 18, 2007

Package information leakage through the Q drive

We all know that if you are a local administrator on a machine that has a SoftGrid client, then you can see all the applications that have data in the local sftfs.fsd cache file by opening the SoftGrid Client Management Console and finding all the applications that don't have a "Idle (0%)" package status. This is because local administrators can see all applications that are defined on a machine in the Client Management Console, whether or not they actually have the proper group memberships or SoftGrid access to be able to start the application.

A colleague (thanks Anthony) pointed me out to another interesting way of finding out what applications have cached data on a SoftGrid client, but that doesn't require administrative privileges. Simply go to the root of the Q drive inside a bubble and look at what asset directories you can see!

It turns out that a user can see all the asset directories of all applications that have some data cached at the client, even if the user doesn't have access to the applications themselves (note: of course you cannot see the contents of these directories since this is prohibited by the isolation; you can only see their existence).

As an illustration, notice on the figure below how the user only has access to Office 2000 and still can see the asset directories of Office 2003 and Office 97 on the Q drive.


You can do this test yourself as an end-user by modifying a locally cached OSD file (hey, they are in the All Users profile with write access for all!) and using the following script tag:

<SCRIPT TIMING="PRE" EVENT="LAUNCH" PROTECT="TRUE" WAIT="TRUE">
<SCRIPTBODY>
@echo off \n
dir q: \n
pause \n
</SCRIPTBODY>
</SCRIPT>

Then (as a local administrator), perform an unload of one of the applications that you don't have access to as a regular user and witness how the next time you use the script above under the user's account, the asset directory has vanished!


Note on motivation:

So you might be thinking... big deal, so what? Who cares about that asset directory being visible or not?

It was important for one of our customers, because they wanted to prevent users from seeing what applications were installed on a machine (locally installed and virtualized). One reason for that was security: knowledge of applications installed might open ways to use certain exploits. Another reason was cost: they had a very peculiar licensing system for a set of applications that required them to cough up the license fee from the moment an end-user could see that the application was installed. I suppose they didn't want to enter a legal dispute whether the visibility off the asset directory would mean they have to start paying license fees ;).

Automatic starting of SoftGrid applications

It is possible to publish applications to the "Startup" menu, i.e. by placing an icon in %CSIDL_PROGRAMS%\Startup location. However, it might not be a good idea.

The problem occurs when you have use the desktop configuration to perform refresh cycles of the shortcuts of the icons, and in this case, the problem is two-fold. First of all, the icon is added to the start menu only after the user has logged in (at least when you configured the SoftGrid client to perform a refresh upon login). This means that the first time the application is published in the Startup menu, the application will not execute since the logon moment has passed and Windows already processed all the Startup menu entries. On the other hand, from that moment onwards, the SoftGrid shortcut will remain in the Startup menu, it points to the locally cached OSD file and the next logoff/logon of the user will start the virtualized application from the Startup menu as expected.

The second problem occurs when retracting the user's rights to this application. The icon will be removed the next time the user logs on again (... if you enabled refresh upon logon, that is; the reasoning remains valid if you use periodic refreshes and the user logs off before that period refresh removed the icon). However, before the SoftGrid client removes the icon, Windows will already have processed the Startup menu and attempted to start the virtualized application, which will result in an error message because the user no longer has the proper rights.

If you manually publish your shortcut in the Start Menu's Startup folder (not relying on the desktop configuration of the SoftGrid client), you are not vulnerable to this error. You will notice that the SoftGrid application will be started upon the user login, as expected.

Terminate Children (yes/no/abort) ?

When you specify the TERMINATECHILDREN="TRUE" value in the VIRTUALENV element, then all processes that are running in the bubble are killed when the main application closes. The name of the element might let you think that only child processes of the executable that you specify as FILENAME in the CODEBASE element are removed, but this appears not to be correct. This also means that any script that you still have running in the background can be killed, or a command prompt that you opened up for troubleshooting.

In my opinion you should be careful using TERMINATECHILDREN, since the child executables and other processes can also perform I/O operations that might get interrupted. If you want to alert the user of the killing of background processes and make them aware of this danger, you might want to check out the LaunchIT utility from Tim Mangan. This utility monitors all child processes that are launched by the main process and optionally alerts the user when child processes remain once the main process has closed.

For more information, see the OSD illustrated which also explains this, or Microsoft KB 931589.

Wednesday, October 17, 2007

Hiding the Q drive on SoftGrid clients

So finally you have gone through the work of getting a SoftGrid server up and running, configuring your clients, sequencing your packages, ... to get a zero footprint of applications on your workstations. And right at that moment it turns out that the SoftGrid client leaves a very visible trace on the client computer: the Q drive is plainly visible there. And what is even worse, inside your bubbles, the end user has full write access on that Q drive (or at least, within the application's asset directory). Are you really ready to become your helpdesk team's new nightmare when all the calls come in, whining about documents saved to Q gone missing? ;)

I think not. So we simply hide the Q drive from the end-users who want to store their documents everywhere but their home drive!

  • First, we must hide the Q drive from the user's desktop. Thanks to the isolation, users cannot access the Q drive (unless they are in a bubble), so hiding the Q drive from the desktop is purely for aesthetic reasons. Edit your domain policy and set the Hide these specified drives in My Computer group policy to hide the Q drive. Since the default options do not include a "Q drive" option, you will need to edit your system.adm file to include such an option; all the details are in Microsoft Knowledgebase article 231289, but basically you should modify the system.adm file as follows:

    POLICY !!NoDrives
    EXPLAIN !!NoDrives_Help
    PART !!NoDrivesDropdown DROPDOWNLIST NOSORT REQUIRED
    VALUENAME "NoDrives"
    ITEMLIST
    NAME !!QOnly VALUE NUMERIC 10000
    ;low 26 bits on (1 bit per drive)
    NAME !!RestNoDrives VALUE NUMERIC 0 (Default)
    END ITEMLIST
    END PART
    END POLICY

    [strings]
    QOnly="Restrict Q drive only"
    RestNoDrives="Do not restrict drives"
    Of course, you can create a separate SoftGrid.adm file that includes this registry change...

    You can also use a registry file along the lines of

    Windows Registry Editor Version 5.00

    [HKEY_CURRENT_USER\Software\Microsoft\Windows\CurrentVersion\Policies\Explorer]
    "NoDrives"=dword:00010000
    "NoViewOnDrive"=dword:00010000
    in the login script to prevent the user from seeing the Q drive.

    Note: The value 0x00010000 displayed above is the value that hides ONLY the Q drive. If you want to hide another drive, or multiple drives, you need to recalculate the value there as described in the knowledgebase article!


  • We also want to hide the Q drive inside the bubble to avoid that a clever user overrides the OS registry values that we just defined, or that a sequencer accidently overwrites these values due to bad packaging. So, we must also include the above registry setting in the virtual registry! Microsoft knowledgebase article 931626 discusses three ways of doing this, but without doubt the cleanest way is to modify your OSD file and add a REGISTRY entry in the between the VIRTUALENV tags:

    <VIRTUALENV>
    <REGISTRY>
    <REGKEY HIVE="HKCU" KEY="Software\Microsoft\Windows\CurrentVersion\Policies\Explorer">
    <REGVALUE REGTYPE="REG_DWORD" NAME="NoDrives">10000</REGVALUE>
    <REGVALUE REGTYPE="REG_DWORD" NAME="NoViewOnDrive">10000</REGVALUE>
    </REGKEY>
    </REGISTRY>
    </VIRTUALENV>

    This does not pollute the user's virtual registry.

    Note: The virtual registry overwrites values from the underlying OS. If your group policy hides other drives than Q, they will reappear if you blindly use the "0x00010000" value shown above as an example!

Of course, this does not prevent the innovative user of accessing the Q drive from within bubbles (after all, it's only hidden). But if they really insist on saving their data on the Q drive, at least now you have a valid reason for applying all your voodoo on them :).

SoftGrid error 0060922C-800736B1

This is a good one to know. If you get the following error message...
The SoftGrid Client could not launch (APPNAME)
This application has failed to start because the
application configuration is incorrect.
Reinstalling the application may fix this problem.

Error code: XXXXXX-0060922C-800736B1

then you might want to consider installing the Visual Studio Runtime Executables. It solved a problem for me where a package streamed ok, but the application itself simply refused to launch (Adobe Reader 8).

More information available at the Microsoft Knowledge Base in article 939084.

Sequencing... WinZIP

There is no real problem in sequencing WinZIP: just follow the standard procedures, and you got yourself another SoftGrid package! Except for one annoying message that keeps on popping up: "WinZIP is currently not associated to...". In the sequencer, this error does not appear.


What goes wrong here is the good ol' File-Type-Association that is handled by SoftGrid and no longer by WinZIP itself. In fact, there is nothing you can do to prevent this message, except for making sure it does not appear anymore. This can be done by adding a virtual registry key AssocMsg at:

HKCU \ Software \ Nico Mak Computing \ WinZip \ WinZip

as a REG_SZ and setting its value to "0". This simply does not show that particular dialog window anymore to the user. This does not impact the functionality of WinZIP, since the filetype associations are handled by the SoftGrid client.

Configuring RTSPS (RTSP over TLS) in SoftGrid

One of the convenient features of SoftGrid is that all the streaming and management traffic can be encapsulated in a TLS tunnel. This is very useful if you want to make SoftGrid available through a webinterface or to internet users. Some documentation is available (MSKB930870) on how you should configure the RTSPS protocol on the SoftGrid server, but very little is said on how you should obtain a server certificate that SoftGrid can understand.

It turns out that SoftGrid requires a cert.pem and key.pem file, and cannot read Microsoft's PKCS#12 certificate stores (where multiple certificates and keys are stored in a single file). So how can you obtain a separate certificate and private key file if you only have a Microsoft Certification Authority in your enterprise? Here's how...

I. Preparing to request the certificate

First of all, you need to create a new certificate template that allows the exporting of private keys from a Microsoft certificate store. If you don't do this, you cannot separate the private key and the actual certificate that are stored in the single PKCS#12 file. An additional complication is that your certification authority need to be running Windows 2003 Enterprise Edition in order to allow for custom templates! If that is all set, do the following steps:

  1. Open a MMC and open the Certificate Templates snap-in.

  2. Rightclick the Webserver template and choose to duplicate it.

  3. Change the following settings:

    • Template Display Name: Webserver (25 years and exportable)

    • Validity period: 25 years


    Also make sure that on the Request Handling tab, the Allow private key to be exported checkmark is checked!

  4. Save the template & exit this MMC.

  5. Next, open the Certification Authory MMC on your CA server, and go to the Certificate Templates branch in the navigation tree on the left. Rightclick and select New template to issue.

  6. Select the template you just created. Afterwards, restart the CA service.

Done! You have just created a new certificate template that allows the private keys of the (entire) certificate to be exported.

II. Requesting the certificate

On your SGVAS server (... you need to do this on every SoftGrid server!), navigate to the CA's certificate webpage, which is typically available at http://ca_hostname/certsrv.

  1. There, select to request a new certificate, select advanced certificate request. Then, select the option to Create and submit a request to this CA..

  2. Enter the following information:

    • Certificate Template: “Webserver (25 years and exportable)

    • Name: use the FQDN of your SGVAS server.

    • Ensure the Mark keys as exportable checkmark is checked.

    • Enable Store certificate in the local computer certificate store.

    • Attributes: can be used to specify additional hostnames for a particular server.

    • Friendly name: specify a human readable name here for the certificate, e.g. SoftGrid SGVAS Certificate.


  3. Click the Submit button when done, and install the certificate afterwards.

That concludes the requesting and installation of the certificate.

III. Preparing to convert the certificate

Before we can convert the certificate into a form that SoftGrid can understand, we must first extract it from the local certificate store again. This is done using by following these steps:

  1. Open a MMC, and select the Certificates snap-in for Local Computer.

  2. Find the certificate you requested under Personal / Certificates.

  3. Rightclick the certificate, select All tasks and choose to export the certificate.

  4. In the next screens, ensure that:

    • The Yes, export private key option is selected.
    • The export format is set to PKCS #12.

  5. Enter a private key password and be sure to remember it!!

  6. Select the filename to save the certificate and private key to, e.g. sgvas.pfx.

Now we're ready to convert the certificate once we have installed the OpenSSL tools which allow the manipulation of X.509 certificates (the Microsoft tools suck). Go to the OpenSSL site and find the page that gives a link to binary distributions. You will be pointed towards the Shining Light Productions Win32 port of OpenSSL. Download and install the light package, the current version is v0.9.8.e.

IV. Converting the certificate for SoftGrid

Follow this procedure to convert the PKCS#12 certificate to a separate private key and security certificate file:

  1. Open a command prompt and go to the installation directory of OpenSSL (default is C:\OpenSSL).

  2. Enter the following command (change the location of the input file sgvas.pfx and output file sgvas.pem as desired):

    openssl pkcs12 -in sgvas.pfx -out sgvas.pem -nodes

    You will be prompted for the import password, which is the private key password that you choose when exporting the certificate in the Microsoft management console.

  3. Open the sgvas.pem file using a text editor like WordPad. Find the part that is enclosed by the BEGIN RSA PRIVATE KEY tags, and copy it entirely (including the begin/end declarations) to a separate file that you call key.pem. The resulting key.pem file should look like:

    -----BEGIN RSA PRIVATE KEY-----
    MIICXAIBAAKBgQC4rRo0XjlmXOAoC+0GawMzqxRpB/i8PsbljR6pKfF1RGxzzN9y
    l/dQN8DYlE9FRLTFruZnKfzMdInYr+nRcGczrRMkkfJiGOpF6DvBkHqwu+j/Rf5g
    hEwdZNJzT48aC0F8H5zZ4hY1E006zQuoS2LTh8A70RsufHd7T0paX2p04QIDAQAB
    AoGBAIX+WxgKEb26v4sdfhsdfjsdkfjhsdjkfhsdjkfhsdjkfhsdjf5HgtL6UPsT
    yNxqeHtCZrwNk/XIzMejA5TJ6KYyaW8YANngLKa8oNDmoQZ65HDok4fenBDMRPUT
    vOfdzYWKBf1Vt9aFVshsoe0htvyGPuashok1K6w4NIKHpkfRAkEA69VzRGS7OuKg
    S4gz3M8ENgS5S0blablablalbalbalbalbalblalbalblablazKubfjP4y7nRioq
    D4s+UUyMFQJBAMh3x6i4mSOFDh5t5Bz0WmqwNW9mNpmgInd/n5Gmdp8pBBRcgTdc
    R84blluqXaq2sWHhaLwMG6YbFz7p24fdXJ0CQEMCzdP7Q3BCAQY1V3dAo5Ot1/Da
    WetlkC9chM37YoKgpKyzA5xAMS71eiCffA1X21SIRJnrM/At/vGXwUdcltkCQDjS
    OrWIHWAEBsx5OX87gsdf789sd7f89sd7f98sd7fsdh3hun6GmZPCHgw9be9FeWHV
    Emq6w9uBMkWS47bO98ECQB+23/UKHZEgxFvamFz4uz2QaxOqLfFqJ7v9Gs8b7fsI
    vsn1FFD36zzTPTzGwqNSVHZNms99ctBdYgZWtMiwJcg=
    -----END RSA PRIVATE KEY-----

  4. Back in the sgvas.pem file, find the part that is enclosed by the BEGIN CERTIFICATE declarations and copy it entirely (including the being/end declarations) to a separate text file that you call cert.pem. An example of how this file should look like:

    -----BEGIN CERTIFICATE-----
    MIIGCzCCA/OgAwIBAgIKF55bUgAAAAAABzANBgkqhkiG9w0BAQUFADA9MRUwEwYK
    CZImiZPyLGQBGRYFbG9jYWwxFzAVBgoJkiaJk/IsZAEZFgdwcmV0bmV0MQswCQYD
    .. .. ..
    d+RlSH6zX6R20XG6sgv4icLxHVhXF3zF3CUnMfkGIQ8rfHYcOmD+mXju/uLXbFYJ
    lid5NBZ7JoNgHoTY/sa9T1ckaoo1MTLL5Kc6X9NUx3fa/tiVPqzjbQPu/Zj/2El3
    4uw1pPuC+x5rT1vsnil4
    -----END CERTIFICATE-----

This gives you a cert.pem and key.pem file that you can use in SoftGrid.

V. Configuring SoftGrid

From this point on, you can follow the procedure described in Microsoft Knowledgebase article 930870. We briefly summarize that here:

  1. Copy both the cert.pem and key.pem files to the following directory:
    C:\Program Files\Softricity\SoftGrid Server\conf

    Ensure that the files are deleted from all other locations to prevent compromising your security (the private key is not supposed to leak out!!)

  2. Open the SoftGrid Management console, go to Server Groups and rightclick the SoftGrid server that the certificate was generated for. Add a new protocol (RTSPS) and fill out the certificate and security key values as follows:
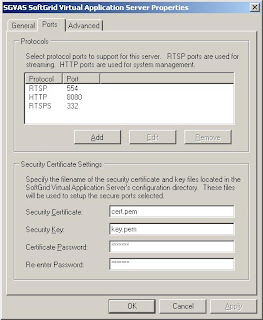

    where you use the password that you entered when exporting the key in the Microsoft Management console.

  3. Modify all your OSD files to use RTSPS and port 332 instead of RTSP at port 554, i.e. replace all occurences of
    rtsp://%SFT_SOFTGRIDSERVER:554/...

    with
    rtsps://%SFT_SOFTGRIDSERVER:332/...

  4. Restart the SoftGrid server to enable RTSPS streaming at the server side.


That finishes the server-side configuration of enabling the RTSPS. Now do not forget to reconfigure your clients to use a Secure SoftGrid Virtual Application Server to let them use RTSPS.


Note: A bug in the SoftGrid client 4.1.0.56 breaks the TLS functionality in the client. You are thus forced to upgrade to 4.1 SP1 / 4.2 or roll back to the 3.x client if you want to use a TLS tunnel!